Please note: When sending mail from a third-party mail client, your copy of the message will be saved in your Sent folder as encrypted, even if the message is sent as non-encrypted. By default, any mail sent via SMTP from a third-party mail program will be sent as non-encrypted, unless the recipient is a Hushmail customer or has previously set a passphrase for receiving encrypted email.
Setting up Hushmail in Outlook
1. From the File menu of your Outlook application, select Info and then Account Settings, as shown here:

2. By default, you should be in the Email tab. Click New from the options provided, as shown here:

3. Type your name, email address and passphrase in to the spaces provided, then select the option to Manually configure server settings or additional server types and click the Next button, as shown here:

4. Select Internet E-mail and click the Next button, as shown here:

5. Input your Hushmail account settings into the appropriate fields, as shown below. When you have finished, click the More Settings button, not the Next button.
User Information
- Your Name: your name
- E-mail Address: your full email address
Server Information
- Account Type: IMAP
- Incoming mail server: imap.hushmail.com
- Outgoing mail server (SMTP): smtp.hushmail.com
Logon Information
- User Name: your full email address
- Password: your email’s passphrase

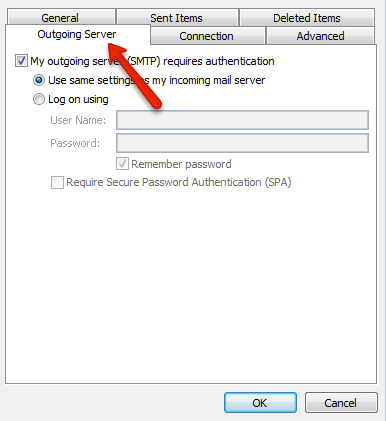
6. From the Outgoing Server tab, check the box for My outgoing server (SMTP) requires authentication and select the option to Use same settings as my incoming mail server, as shown below. Do not click the OK button until you have completed the next step (7).
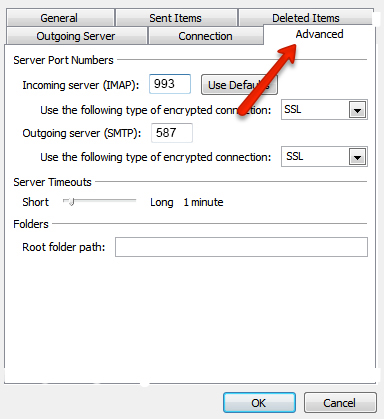
7. Next, in the Advanced tab, input the following settings into the appropriate fields, as shown below.
- Under Incoming Server (IMAP), enter in 993 as the Port Number, and select SSL for the Use the following type of encrypted connection option.
- Under Outgoing Server (SMTP), enter in 587 as the Port Number, and select SSL for the Use the following type of encrypted connection option.
8. When you have finished, click the OK button.
9. Click the Finish button, as shown here:

10. Click the Close button, as shown here:

Troubleshooting Tip
If you’re having trouble sending email, try again with the following alternate SMTP Server settings:
Alternate SMTP Server
- Server Hostname: smtp.hushmail.com
- Port: 465
- SSL: Enabled